


Table of contents
- Introduction
- Project Demo
- Why AWS Amplify
- Requirements
- Project Overview
- Project Business Logic
- Setting up Our Frontend Project.
- Setting up Our Backend Project.
- How to Set up Authentication With AWS Amplify in an Application
- How to Set up AWS Amplify Authentication in React
- Adding Products to the Platform
- Implementing Add Item to Cart Functionality
- Implement the Order Functionality
- How to Host Web Application in AWS Amplify
- Wrapping up and Next Steps
- Resources and References
Introduction
AWS Amplify facilitates getting started with AWS for web and mobile app development because it is easy to use and flexible. It supposes a command line interface (CLI) and Graphical user interface (GUI) where you can configure AWS services.
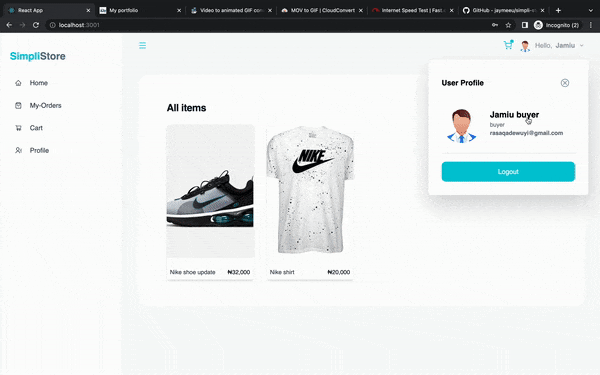
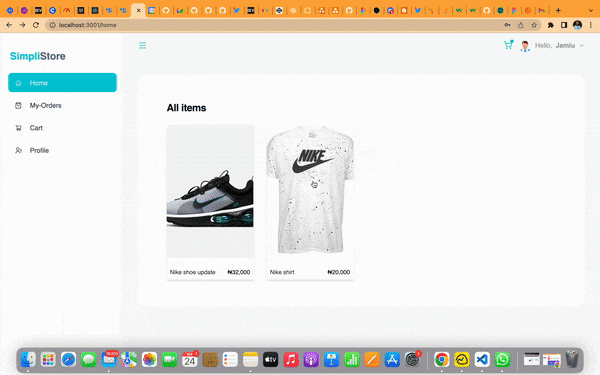
Here is a sneak preview of what we will be building
The source code of the project is available on Github
In this article, I will showcase how I use AWS Amplify as the backend and React as a frontend for building a fully functioning e-commerce web application. We will do more of our configuration from the GUI interface and less from the CLI.
Project Demo
Below is a video demo of what we will be building in this article
Below are login credential to explore SimpliStore.
Site Link : main.det8r7hs94pud.amplifyapp.com/home
Seller: Username: adewuyirasaqjamiu@gmail.com Password: 111111
Buyer: Username: jamiu.stilltesting@gmail.com Password: 111111
Why AWS Amplify
Aws Amplify is a set of tools that brings the power of AWS to frontend web and mobile development. It supports IOS, Flutter, Andriod, and Javascript frameworks such as React, React-native, NextJS, and VueJS.
It can be used to build the application backend. With AWS Amplify, we can enable hosting, storage, authentication, and file storage, ready to be consumed by the frontend, which we will explore in the article.
Requirements
Before we get started, be sure to have:
- AWS Account created,
- AWS Amplify CLI installed and configured. Check official documentation for guide
- Basic knowledge of JavaScript and ReactJS.
Project Overview
I chose this project because it was helpful enough to examine various AWS Amplify features and functionality. I wanted to show developers how easy and flexible it is to build an application backend with it. Below are some of what we will be working within this project:
ReactJS: Our Javascript framework of choice. We will use this framework to build our frontend.
AWS Amplify: We will use this to build our backend. This project will use the Amplify GUI, Amplify CLI, Amplify libraries, and Amplify hosting.
AWS Amplify Services We Will Be Using
- Cloudfront: For hosting
- Amazon Cognito: For authentication
- Amazon S3: For storing images
- App sync: It is managed GraphQL service with a build-in web socket support
- Dynamo DB: For storing information
Project Business Logic
In this project, we will be having two personas, which are the seller and the buyer
Seller
Below are what the seller should be able to do:
- Registration and login
- Update profile.
- View a list of all products on the platform.
- View more details of each product
- View their store, i.e., the products he/she added to the platform
- Manage their store
- View orders, i.e., orders placed on their product.
Buyer
Below are what the buyer should be able to do:
- Registration and login
- Update profile.
- View a list of all products on the platform.
- View more details of each product
- Add products to their cart, i.e., the products they wish to place an order on
- View a list of all products in their cart.
- Checkout on each of the products in the cart to confirm the order
- View the list of orders made.
That is the basic overview of what this project is all about
With these said, let's get our hands dirty
Setting up Our Frontend Project.
As stated earlier, the frontend will be implemented with React, and we will use the Tailwind CSS framework for styling. I prepare the user interface design in the github repository to make this tutorial easy to follow.
Setting up Our Frontend Project
- Open visual studio code.
Fork or clone the github repository. Run the below code in the terminal to clone.
git clone https://github.com/jaymeeu/simpli-store-UI.gitInstall dependencies. Run the below code in the terminal to install dependencies
npm install
- Start the project. Run the below code in the terminal to start project
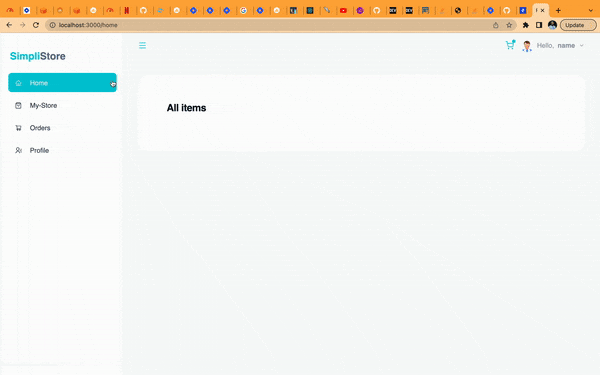
npm start
As shown below, we should have a running app with all these steps.
Setting up Our Backend Project.
To get started, run amplify version command in your terminal, to confirm amplify CLI is installed.
I recommend checking and watching the video on the AWS official documentation guide to install and configure amplify CLI.
With these done, let's set up our backend.
How to Create an Application With AWS Amplify
- Login to the AWS console
- In the console search bar, type in
amplifyand click on the AWS Amplify from the research result - On the Amplify page, we need to create a new app. Click the
New Appdrop-down and selectbuild an app. - Enter the app name and click the
confirm deploymentbutton - Wait while AWS setup your app environment
- Once completed, click the
Launch Studiobutton to open the amplify studio
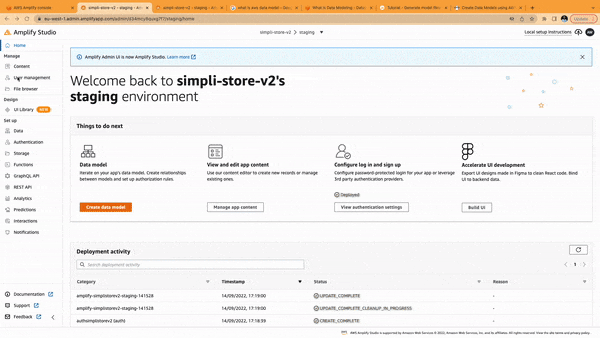
Once the studio is launched, you should have a screen similar to that shown below.
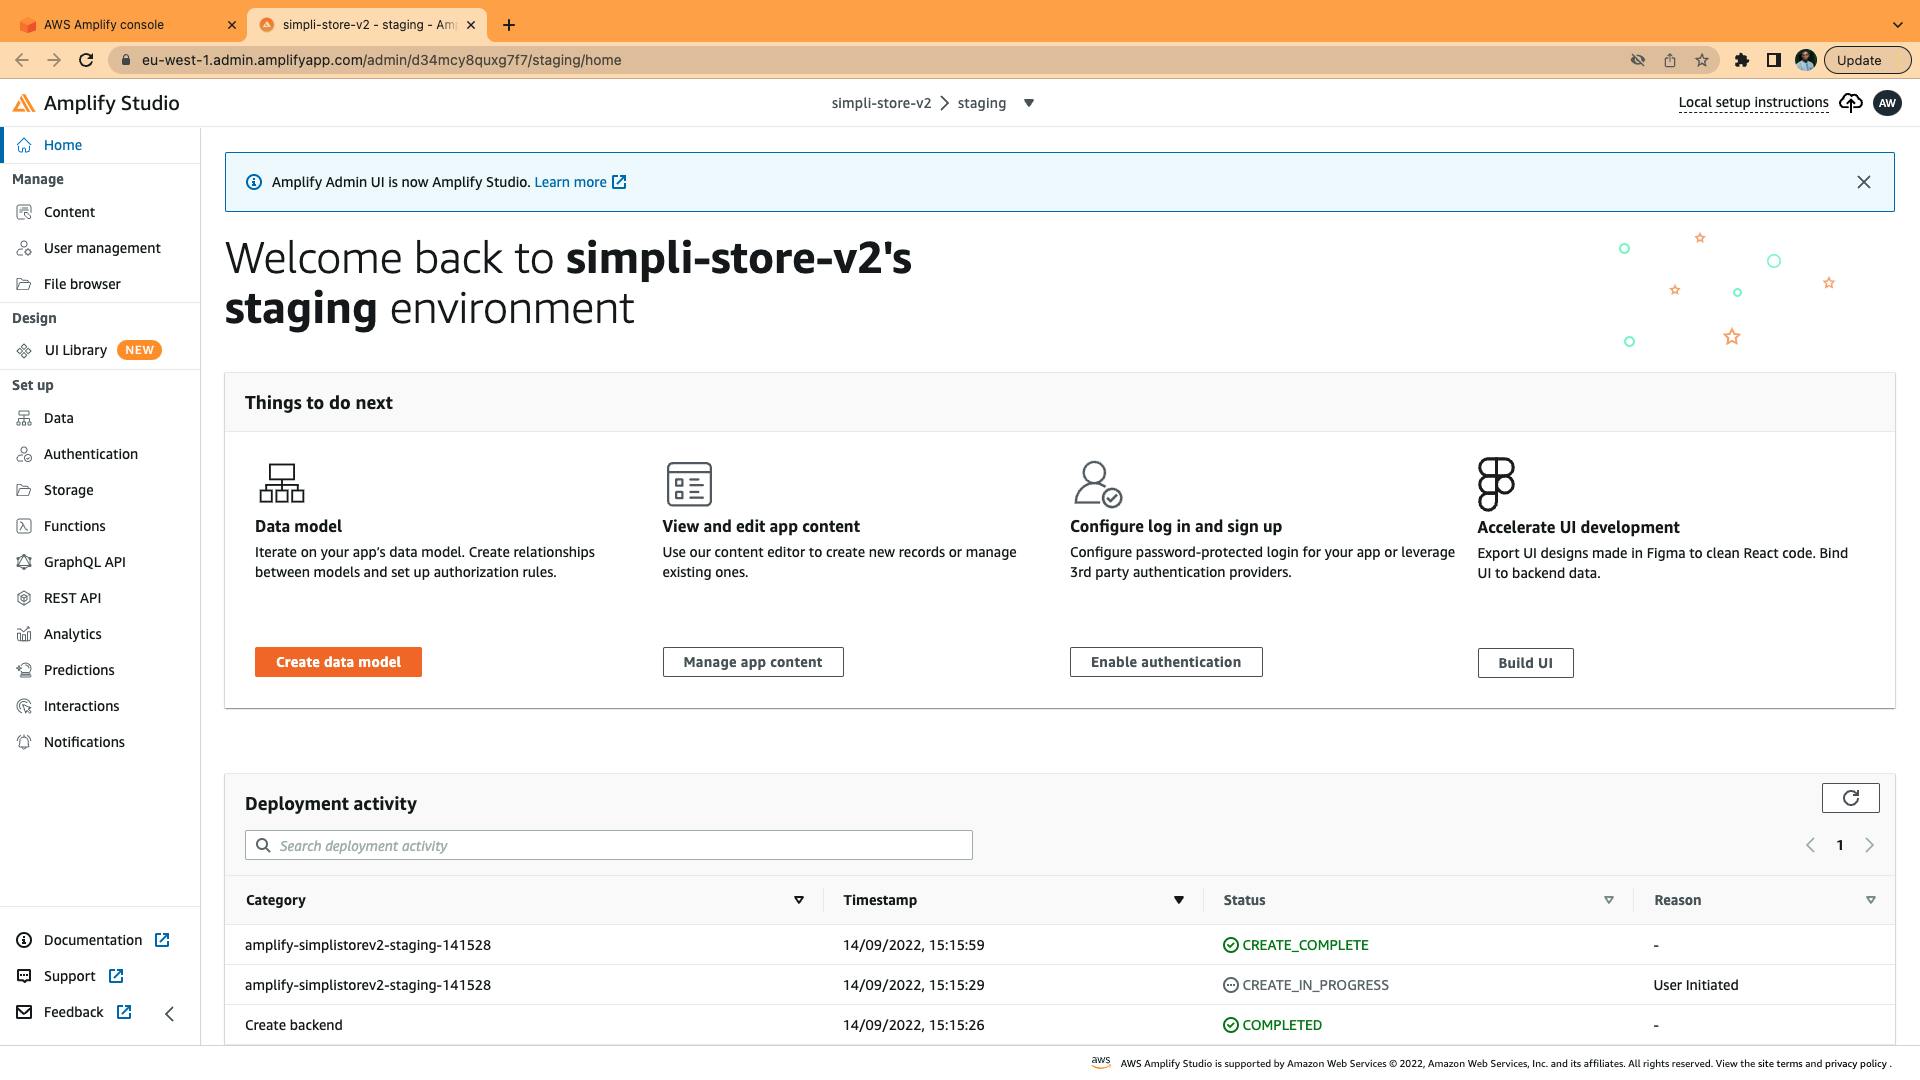
Get yourself familiar with the interface as this is where we will be configuring our backend features.
The first feature we will be configuring is authentication.
How to Set up Authentication With AWS Amplify in an Application
The authentication feature will help us manage login, signup, forget passwords, and verify OTP. Here is where we will configure login as well as configure sign up. To set up,
- Click the
Authenticationtab on the side menu - Click the
Password protection settings - Set the password policy, as the length in characters as 6, and uncheck all checkboxes to keep the password simple.
- Leave every other thing as default
- Click the
Deploybutton andConfirm deployment - Wait while AWS deploys your authentication
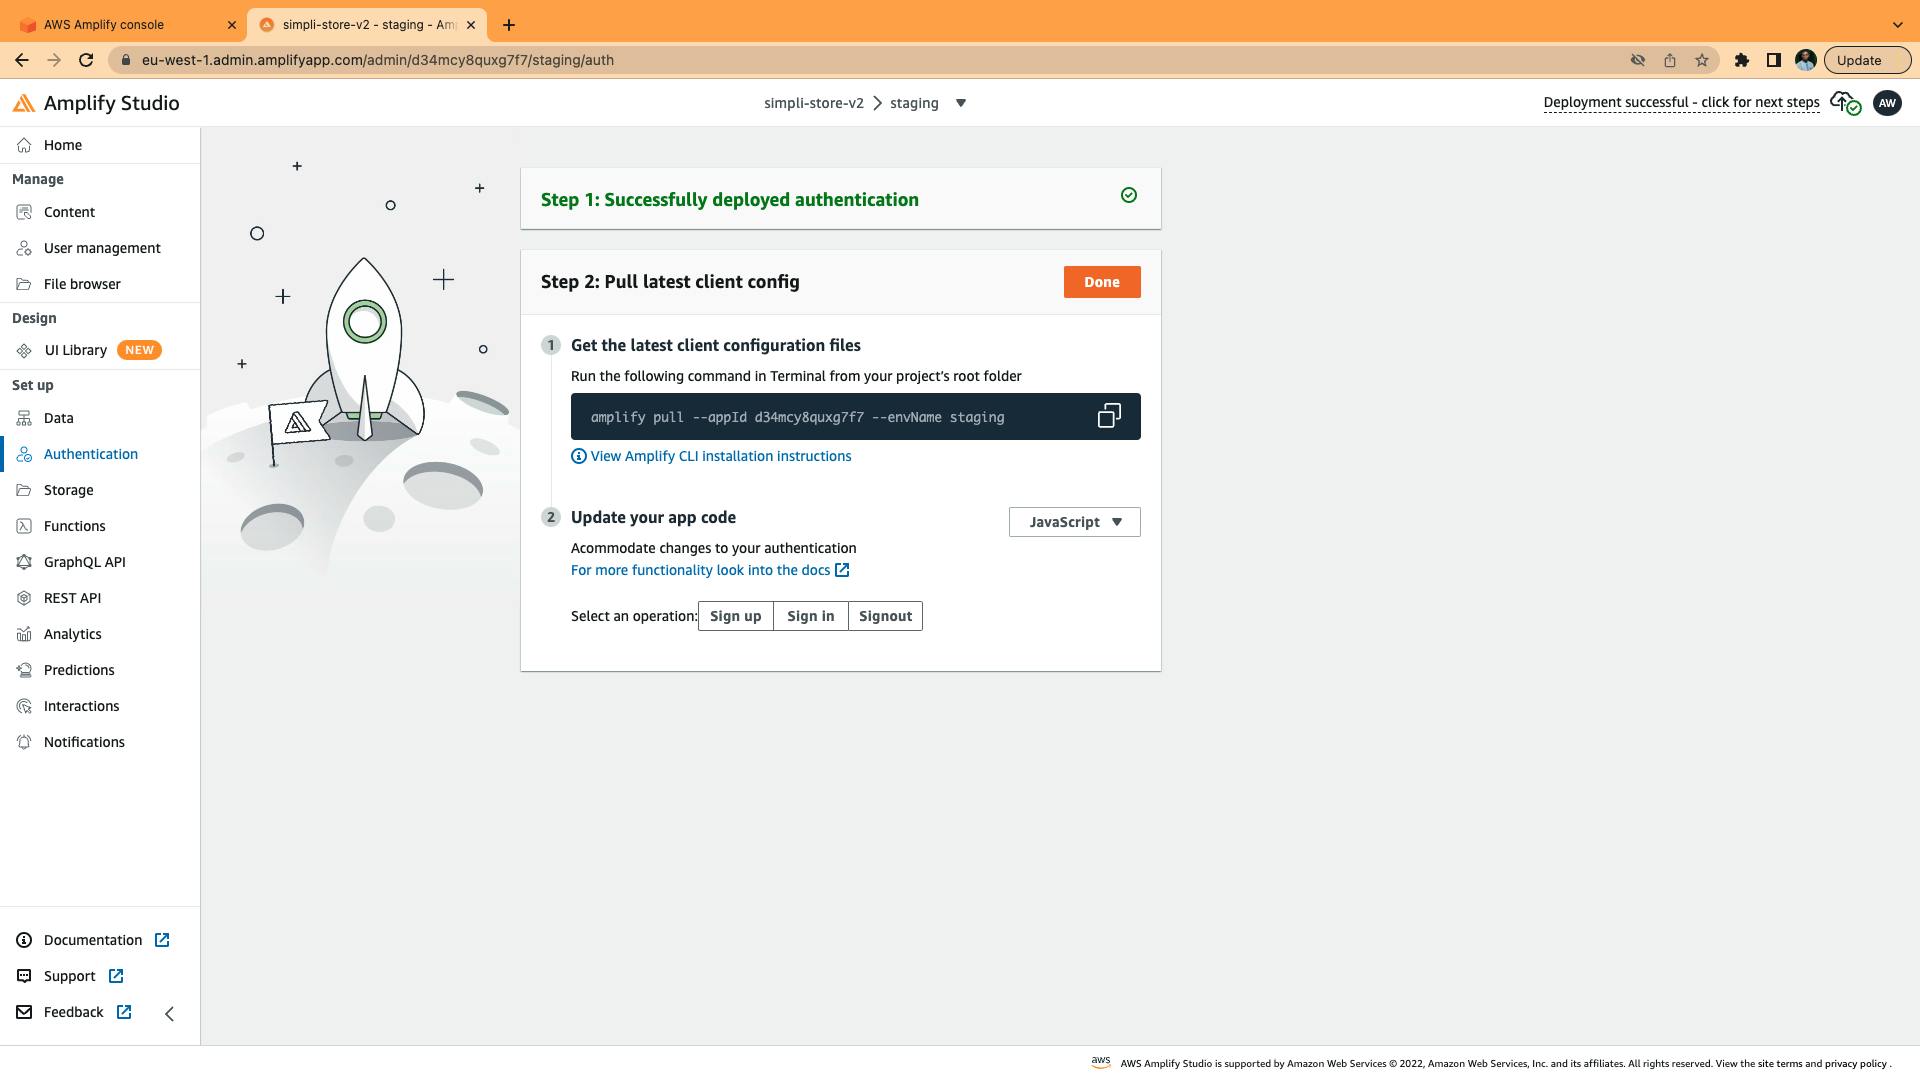
- Once deployment is completed, congratulations, you have an authentication flow ready to consume. Successful deployment should display as shown below
With this done, the next is to pull our backend into our frontend. It will be a norm every time we make changes on the backend.
To pull, copy the
amplify pullcommand as shown below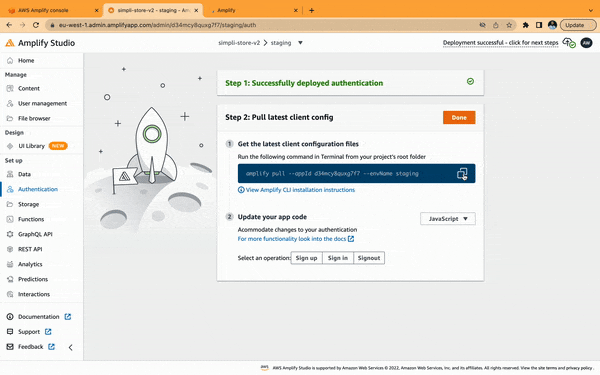
In the terminal in our frontend project run the pull command
amplify pull --appId ************** --envName staging.- A browser tab will be opened, where amplify CLI request permission, clicking yes to grant permission
- Since it is the first time pulling amplify will ask some questions that will allow it to create some configuration files. Kindly supply responses as below except otherwise for Choose your default editor, where you need to supply your editor. In my case, I am using Visual Studio Code
? Choose your default editor: Visual Studio Code ? Choose the type of app that you're building javascript Please tell us about your project ? What javascript framework are you using react ? Source Directory Path: src ? Distribution Directory Path: build ? Build Command: npm run-script build ? Start Command: npm run-script start ? Do you plan on modifying this backend? YesSuccessfully pulled backend environment staging from the cloud.
Note: Subsequent pull will be to run
amplify pull
With these done, next is to consume authentication flow in our frontend.
How to Set up AWS Amplify Authentication in React
After successfully pulling our backend, you should notice a folder, namely amplify and a file, namely aws-exports.js, are created for us, and We will need resources from them as we progress.
Install AWS Amplify Dependencies
To start with, let's install these dependencies from AWS by running the below command
npm install aws-amplify @aws-amplify/ui-react
How to Configure AWS Amplify in React
Next is to add the configuration file to the root file of our project
- Let's update
App.jsas below.
import { Amplify } from 'aws-amplify';
import awsconfig from './aws-exports';

Amplify.configure(awsconfig);
With the above configuration added, we can start interacting with our backend. To add authentication flow to our project, AWS provides a higher-order component, withAuthenticator, that will be imported from @aws-amplify/ui-react. This component will take care of authentication from us.
Update the App.js file as below and save.
import React from 'react'
import Routing from './Routing'
import { Amplify } from 'aws-amplify';
import awsconfig from './aws-exports';
import {withAuthenticator} from "@aws-amplify/ui-react"
import '@aws-amplify/ui-react/styles.css';

Amplify.configure(awsconfig);

const App = () => {
  return (
    <div>
     <Routing/>
    </div>
  )
}
export default withAuthenticator(App)
On saving this file you will get an error message, don't worry this is a result of the withAuthenticator component added to App.js.
To fix this, we need to restart our server (stop the server and start again).
Ctrl + C to stop and npm start to start
We should have, as shown below.
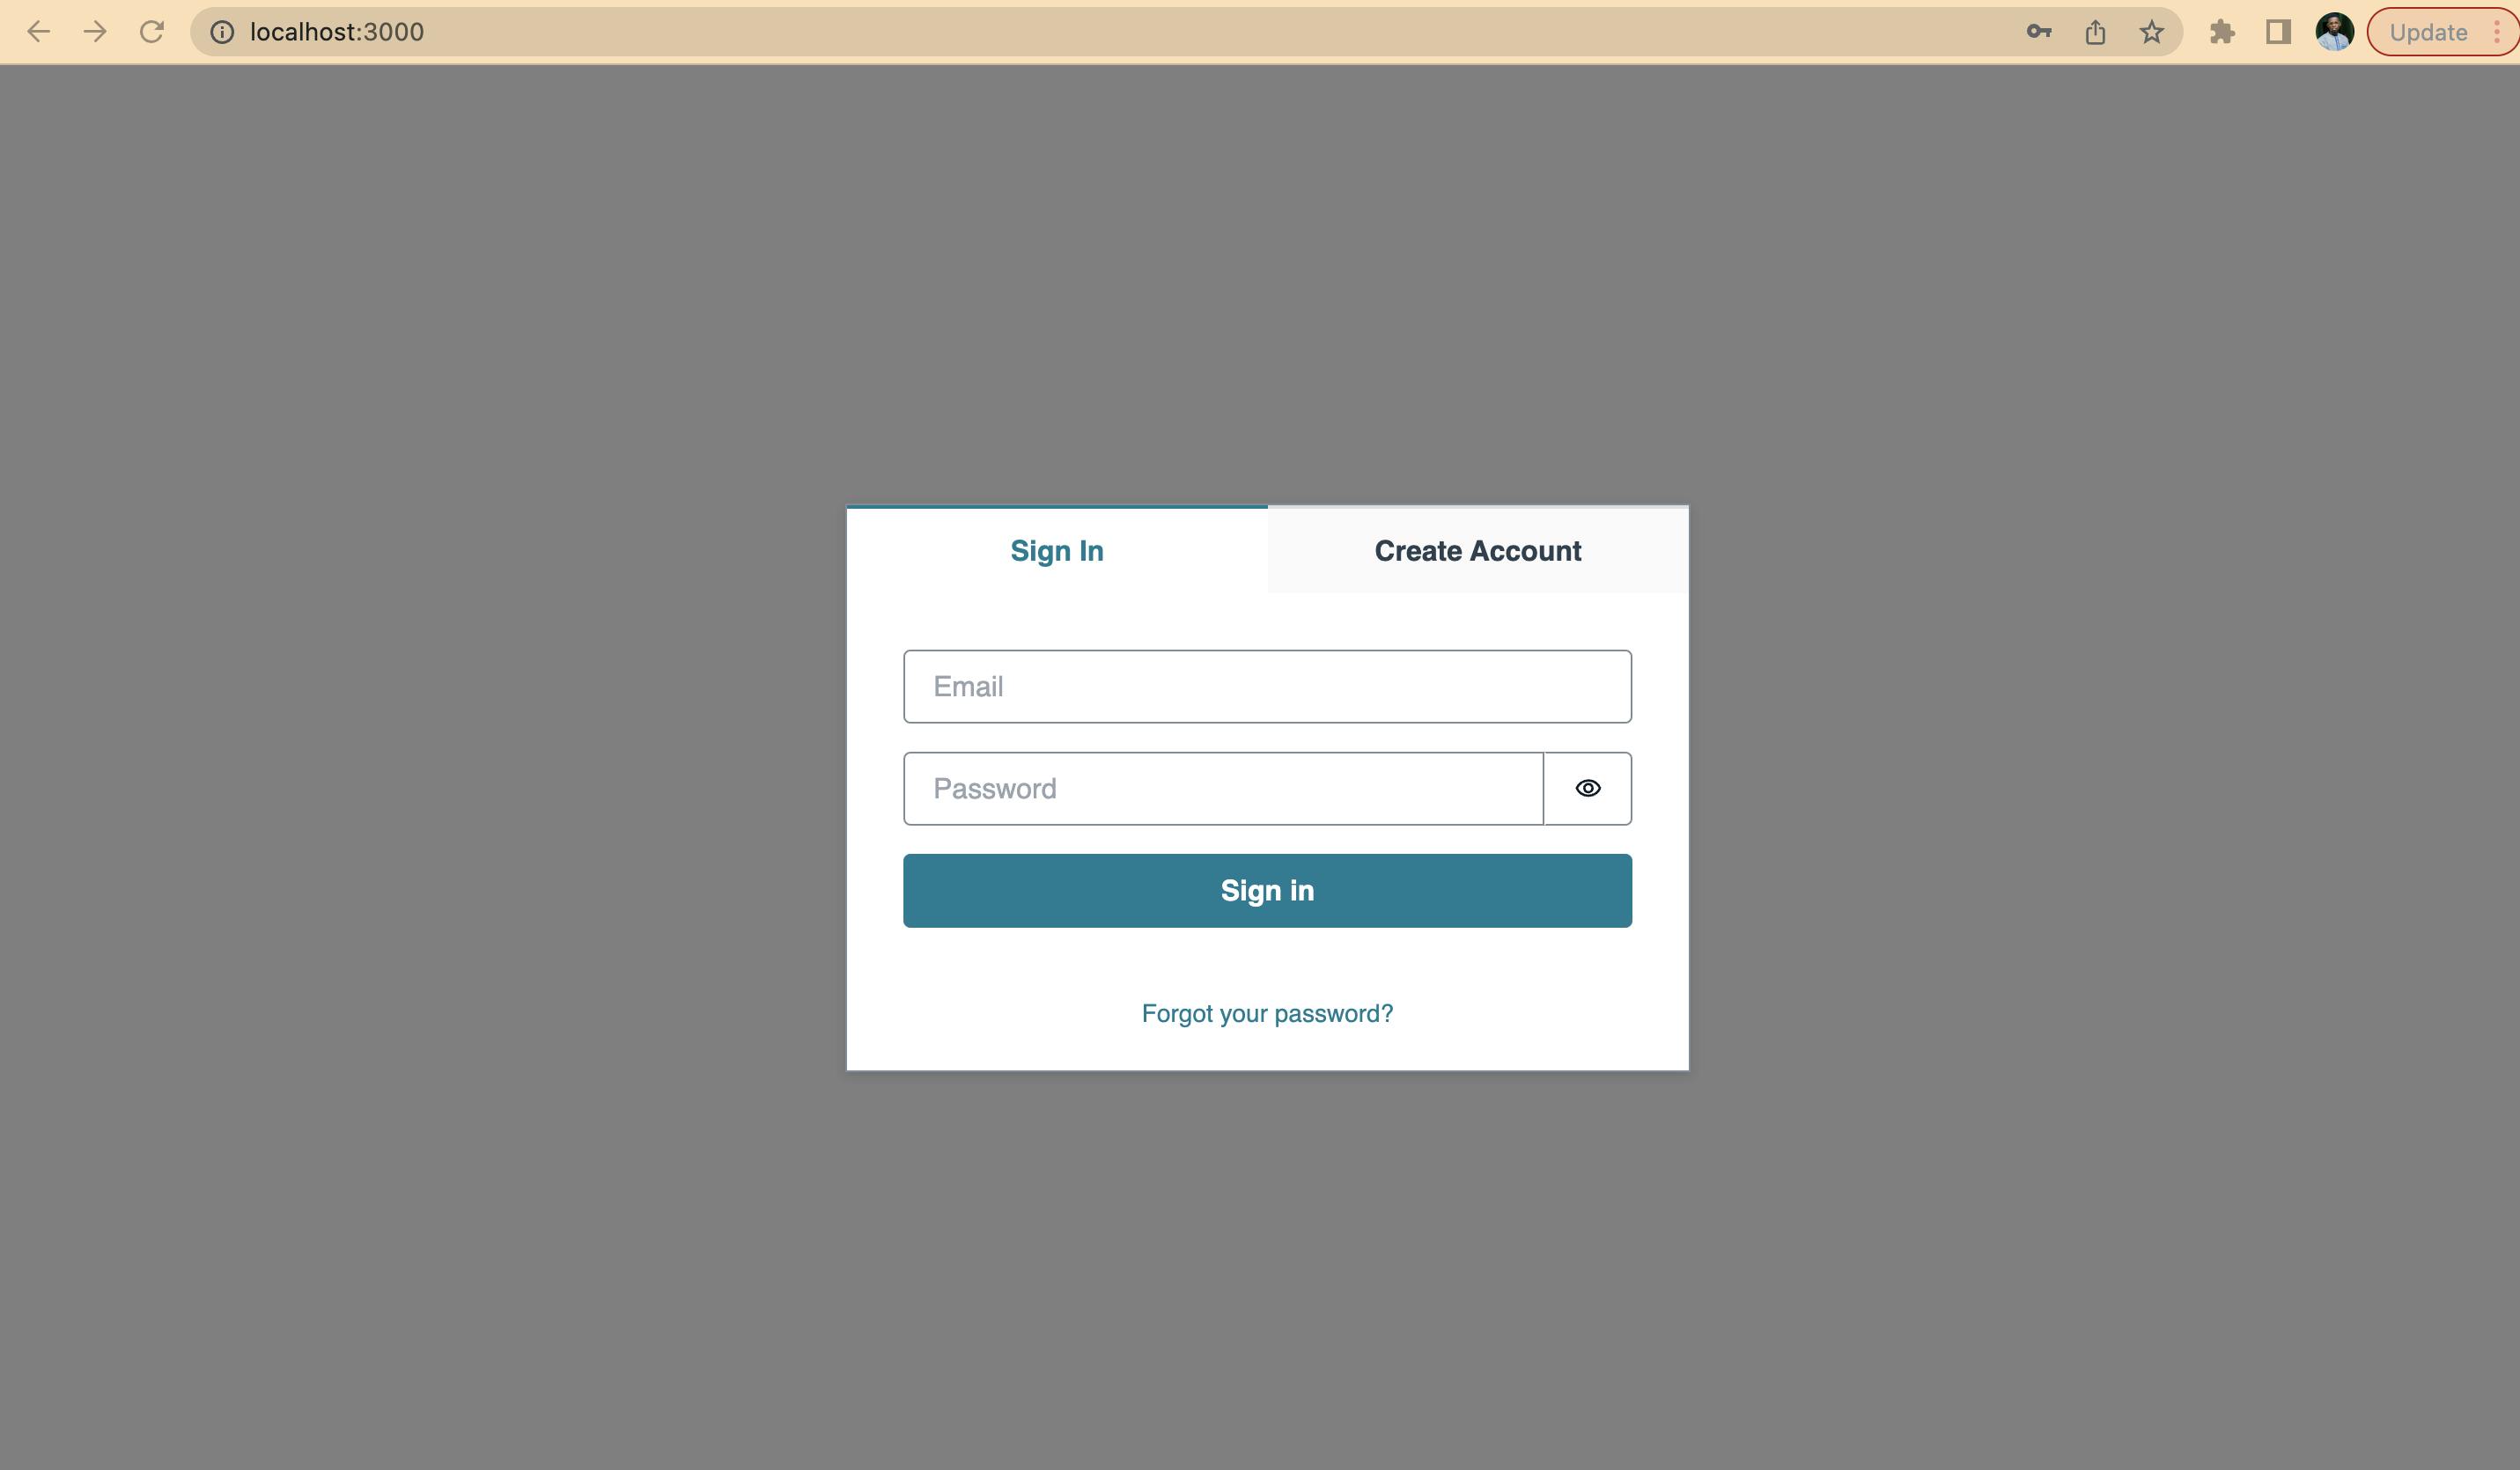
The above shows the default theme and design from withAuthenticator component. AWS understands that the default theme might not work with everyone's project design; therefore, it provides a way to create your custom theme to suit your project design.
In a case where your project requires an entirely different design authentication design flow, then withAuthenticator can not be used, however.
Towards the end of this article, I will add resources explaining how to create a custom theme for the withAuthenticator component and how to create a custom authentication flow with AWS Amplify.
In the case of this project, withAuthenticator work just fine.
Go ahead and create an account. Make sure to use a valid email address, as OTP will be sent.
On successful OTP verification, you will see our home page. With this, only authentication users can access this platform.
On the amplify studio, click on the user management to see the registered user.
Note: AWS Cognito manages authentication; therefore user information is stored in the Cognito table, not the database table.
To manage users' information, we need to create a database model to store users' information.
How to Create Data Models in AWS Amplify Studio.
Models in Amplify is liken to creating a database table (DynamoDB table).
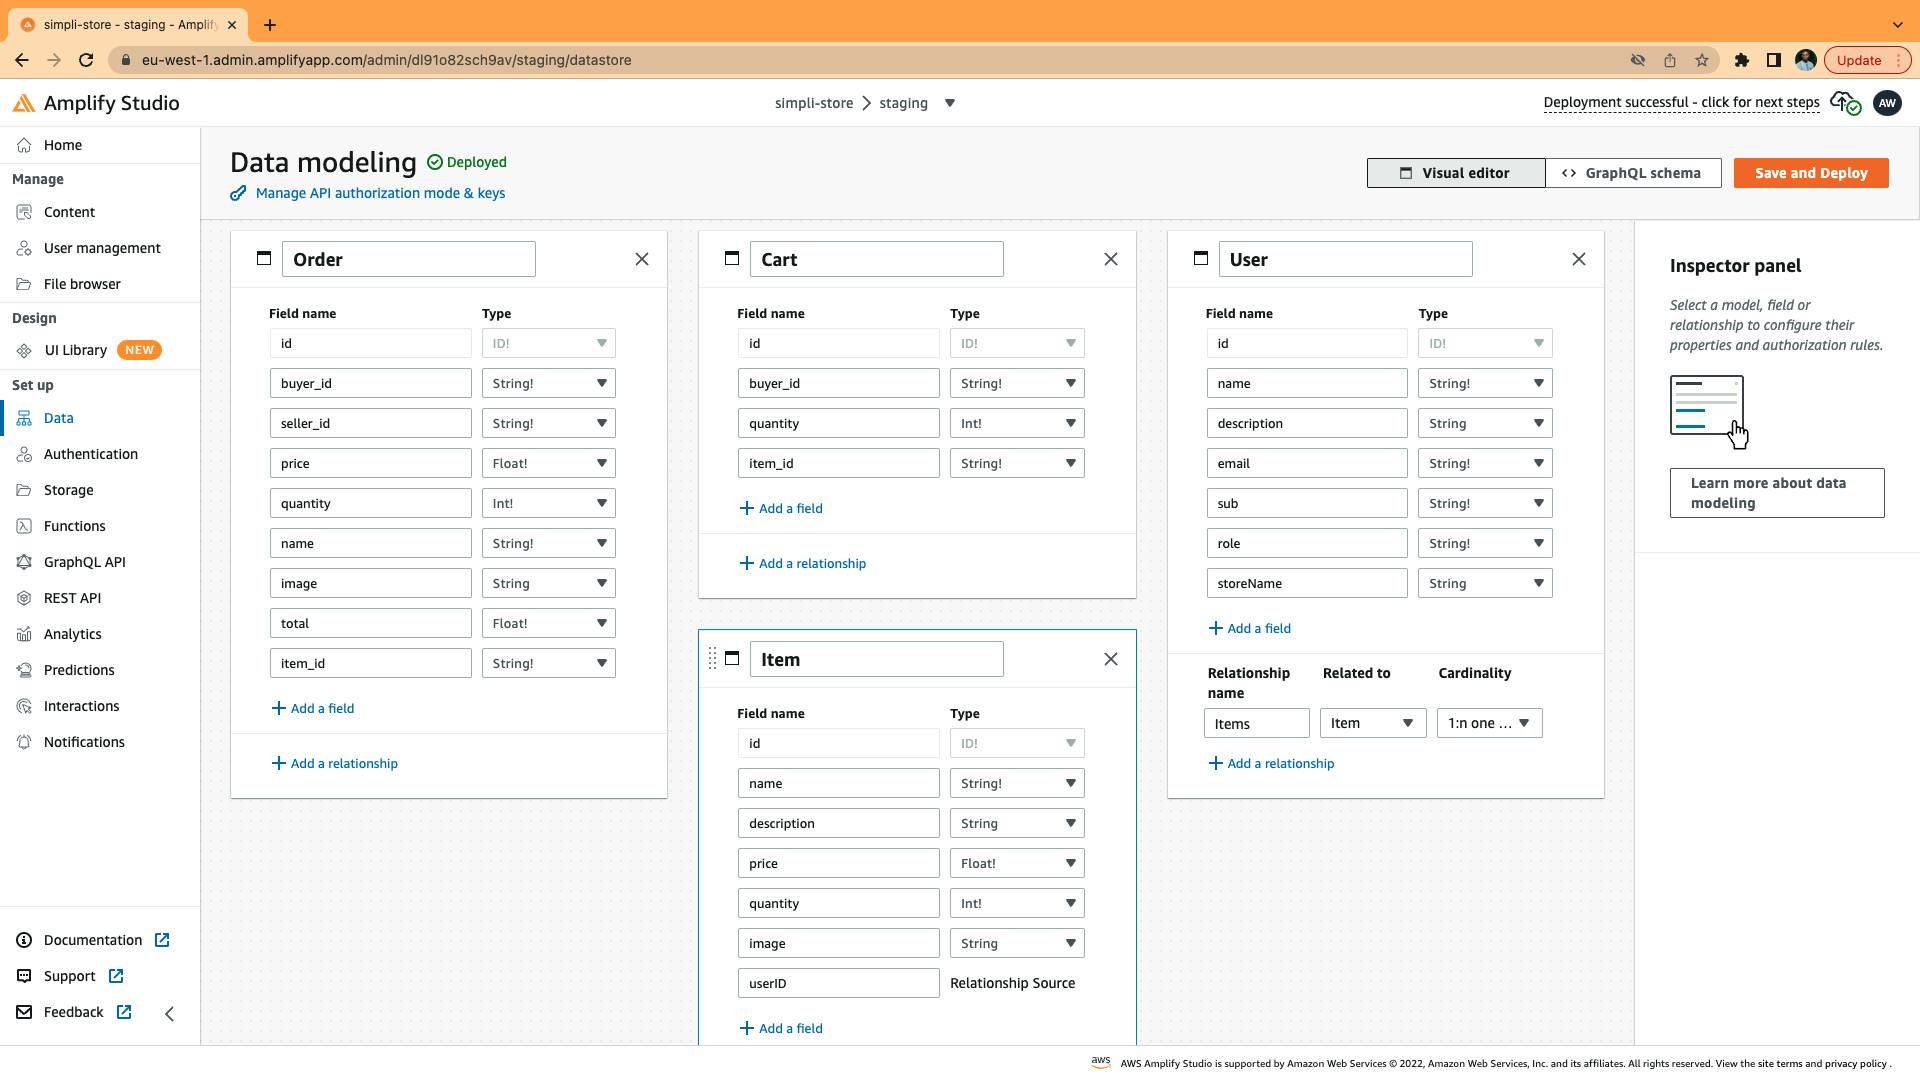
In this project, we will be creating four models (table).
- User model - To store user information
- Item model - To store items information
- Cart model - To store user cart information
- Order model - To store user order information
User model
| Field name | Data type | Is required |
| name | string | yes |
| description | string | no |
| string | yes | |
| sub | string | yes |
| role | string | yes |
| storeName | string | no |
| Relationship | type |
| User to item | one-to-many |
Note: Add a one-to-many relation from the user to the item. This is so because one user can add many items
Item model
| Field name | Data type | Is required |
| name | string | yes |
| description | string | no |
| price | float | yes |
| quantity | int | yes |
| image | string | no |
Cart model
| Field name | Data type | Is required |
| buyer_id | string | yes |
| quantity | int | yes |
| tem_id | string | yes |
Order model
| Field name | Data type | Is required |
| buyer_id | string | yes |
| seller_id | string | yes |
| price | float | yes |
| total | float | yes |
| quantity | int | yes |
| item_id | string | yes |
| name | string | yes |
| image | string | no |
Confirm your data model look as below:
After confirming the model looks good, click the save and deploy button to deploy, incase you made mistake you can always come back to modify it.
Once the deployment is completed, open the terminal in your VScode, and run amplify pull to pull the latest change.
Next is to look into how to store users in the database. As said earlier, user information is stored in the Cognito table, not the database table. The logic used is for every time a user login into the platform:
- We check if their information is in the database,
- If yes, user information is displayed
- Else user update form will display for the user to fill and submit,
- On submission, user information will be saved to the database.
Let's create a context to manage our authentication.
Creating an Authentication Context
Create a new file AuthContext.js in the context folder and update the code as below:
import { useState, useEffect, useContext, createContext} from "react";
import { Auth, DataStore } from 'aws-amplify'
import { User } from "./../models";

const AuthContext = createContext({});

const AuthContextProvider = ({ children }) => {
    const [authUser, setauthUser] = useState(null)
    const [dbUser, setDbuser] = useState(null)

    const sub = authUser?.attributes?.sub

    // get currently logged in user from Cognito table
    useEffect(() => {
       //store authenticated user information
        Auth.currentAuthenticatedUser({ bypassCache: true }).then(setauthUser)
    }, [])


    // get currently logged in user from the database
    useEffect(() => {
        DataStore.query(User, (user) => user.sub('eq', sub))
            .then((user) => {
                //store database user information
                setDbuser(user[0])
                console.log(user[0], 'usersrsrsrs')
            })
    }, [sub])

    return (

        <AuthContext.Provider
            value={{ authUser, dbUser, setDbuser, sub }}
        >
            {children}
        </AuthContext.Provider>
    )
}
export default AuthContextProvider;

export const useAuthContext = () => useContext(AuthContext)
Add Authentication Context to App.js
Adding authentication context to the root file will allow us access to authUser, dbUser, setDbuser, sub from anywhere in our app.
Let's update the App.js file like so :
import React from 'react'
import Routing from './Routing'
import { Amplify, Auth } from 'aws-amplify';

import { withAuthenticator } from '@aws-amplify/ui-react';
import '@aws-amplify/ui-react/styles.css';

import awsconfig from './aws-exports';
import AuthContextProvider from './contexts/AuthContext';

Amplify.configure({...awsconfig, Analytics : {disabled : true}});

const App = () => {

  return (
    <div>
      <AuthContextProvider >
        <Routing/>
      </AuthContextProvider>
    </div>
  )
}

export default withAuthenticator(App)
Once done, next is to display user information where needed.
Since we already store database user information dbUser in context, we can access it in every file in the project.
Let's update dummy data in UserProfile.jsx, Navbar.jsx and Profile.jsx with real data dbUser
let's update UserProfile.jsx like so :
import React from 'react';
import { MdOutlineCancel } from 'react-icons/md';

import  Button  from './Button';
import { useStateContext } from '../contexts/ContextProvider';
import avatar from '../assets/avatar.webp';
import { useNavigate } from 'react-router-dom';
import { useAuthContext } from '../contexts/AuthContext';
import { Auth} from 'aws-amplify'

const UserProfile = () => {
  const { handleClick } = useStateContext();
  const  {dbUser} = useAuthContext()
  const navigate = useNavigate();

  return (
    <div className="nav-item absolute right-1 top-16 bg-white p-8 rounded-lg w-96 drop-shadow-2xl z-20">
      <div className="flex justify-between items-center">
        <p className="font-semibold text-lg dark:text-gray-200">User Profile</p>
        <Button
          onClick={() => handleClick('userProfile')}
          icon={<MdOutlineCancel />}
          color="rgb(153, 171, 180)" bgHoverColor="light-gray"
          size="2xl" borderRadius="50%"
        />
      </div>
      <div
        onClick={() => {handleClick('userProfile'); navigate('/profile') }}
        className="flex gap-5 items-center mt-6 border-color border-b-1 pb-6 cursor-pointer"
       >
        <img
          className="rounded-full h-24 w-24"
          src={avatar}
          alt="user-profile"
        />
        <div>
          <p className="font-semibold text-xl dark:text-gray-200"> {dbUser?.name} </p>
          <p className="text-gray-500 text-sm dark:text-gray-400">  {dbUser?.role}   </p>
          <p className="text-gray-500 text-sm font-semibold dark:text-gray-400"> {dbUser?.email} </p>
        </div>
      </div>

      <div className="mt-5">
        <Button color="white" bgColor='var(--main)'
          text="Logout"
          borderRadius="10px" width="full"
          onClick={() => {
            handleClick('userProfile')
            navigate('/');
            Auth.signOut()
          }}
        />
      </div>
    </div>

  );
};

export default UserProfile;
let's update Navbar.jsx like so :
import React from 'react';
import { AiOutlineMenu } from 'react-icons/ai';
import { FiShoppingCart } from 'react-icons/fi';
import { MdKeyboardArrowDown } from 'react-icons/md';

import avatar from '../assets/avatar.webp';
import Cart from '../components/Cart';
import UserProfile from '../components/UserProfile'

import { useStateContext } from '../contexts/ContextProvider';
import { useAuthContext } from '../contexts/AuthContext';

const Navbar = () => {
  const  {dbUser} = useAuthContext()


    const NavButton = ({ customFunc, icon, color, dotColor }) => (
        <button
            type="button"
            onClick={() => customFunc()}
            style={{ color }}
            className="relative text-xl rounded-full p-3 hover:bg-light-gray"
        >
            <span
                style={{ background: dotColor }}
                className="absolute inline-flex rounded-full h-2 w-2 right-2 top-2"
            />
            {icon}
        </button>
    );

    const { activeMenu, setActiveMenu, handleClick, isClicked } = useStateContext();

    const handleActiveMenu = () => setActiveMenu(!activeMenu);

    return (
        <div className="flex justify-between items-center p-2 md:ml-6 md:mr-6 relative">
            <p className='block md:hidden'>
                <span className="font-bold " style={{color:'var(--main)'}}>Simpli</span>
                <span className="font-semibold text-slate-500">Store</span>
            </p>
            <div className='hidden md:block'>
                <NavButton title="Menu" customFunc={handleActiveMenu} color='var(--main)' icon={<AiOutlineMenu />} />
            </div>
            <div className="flex">
                <NavButton title="Cart" dotColor="var(--main)" customFunc={() => handleClick('cart')} color="var(--main)" icon={<FiShoppingCart />} />
                <div
                    className="flex items-center gap-2 cursor-pointer p-1 hover:bg-light-gray rounded-lg"
                    onClick={() => handleClick('userProfile')}
                >
                    <img
                        className="rounded-full w-8 h-8"
                        src={avatar}
                        alt="user-profile"
                    />
                    <p>
                        <span className="text-gray-400 text-14">Hello,</span>{' '}
                        <span className="text-gray-400 font-bold ml-1 text-14">
                            {dbUser?.name.split(" ")[0]}
                        </span>
                    </p>
                    <MdKeyboardArrowDown className="text-gray-400 text-14" />
                </div>

                {isClicked.cart && (<Cart />)}
                {isClicked.userProfile && (<UserProfile />)}
            </div>
        </div>
    );
};

export default Navbar
let's update Profile.jsx like so :
import React, { useState } from 'react'
import { AiFillStar, AiOutlineStar } from 'react-icons/ai'
import { FiEdit } from 'react-icons/fi'
import Button from '../components/Button'
import UpdateUser from '../components/UpdateUser'
import { useAuthContext } from '../contexts/AuthContext'

const Profile = () => {

    const [showEdit, setshowEdit] = useState(false)

    const { dbUser } = useAuthContext()

    return (
        <div className="m-5 md:m-10 mt-24 p-1 md:p-10 bg-white rounded-3xl">
            {

                showEdit && <UpdateUser
                    showClose={true}
                    close={() => setshowEdit(false)}
                />
            }
            <div className="bg-white">
                <div className="mx-auto py-4 px-4 sm:py-6 sm:px-6 lg:max-w-7xl lg:px-8 lg:w-2/3">
                    <div className="mt-6 flex justify-between space-x-2 align-middle ">
                        <h2 className="text-2xl font-bold tracking-tight text-gray-900">Profile</h2>
                        {dbUser?.role === 'seller' && ( <Button
                            onClick={() => setshowEdit(true)}
                            icon={<FiEdit />}
                            color="rgb(153, 171, 180)"
                            bgHoverColor="light-gray"
                            size="2xl"
                            borderRadius="50%"
                        />)}
                    </div>

                    <div className="mt-6 flex justify-between space-x-2 align-middle ">
                        <p className=' text-left text-l font-semibold text-slate-500' >Fullname</p>
                        <p className=' text-right text-l text-slate-500' >{dbUser?.name}</p>
                    </div>

                    <div className="mt-6 flex justify-between space-x-2 align-middle">
                        <p className=' text-left text-l font-semibold text-slate-500' >Email</p>
                        <p className=' text-right text-l text-slate-500' >{dbUser?.email}</p>
                    </div>
                    {
                        dbUser?.role === 'seller' && (
                            <>
                                <div className="mt-6 flex justify-between space-x-2 align-middle">
                                    <p className=' text-left text-l font-semibold text-slate-500' >Store name</p>
                                    <p className=' text-right text-l text-slate-500' >{dbUser?.storeName}</p>
                                </div>

                                <div className="mt-6 flex justify-between space-x-2 align-middle ">
                                    <p className=' text-left text-l font-semibold text-slate-500' >Description</p>
                                    <p className=' text-right text-l text-slate-500' >{dbUser?.description}</p>
                                </div>

                                <div className="mt-6 flex justify-between space-x-2 align-middle">
                                    <p className=' text-left text-l font-semibold text-slate-500' >Rating</p>
                                    <p className=' text-right text-l text-slate-500' >
                                        <div className="stars">
                                            <AiFillStar size={20} />
                                            <AiFillStar size={20} />
                                            <AiFillStar size={20} />
                                            <AiOutlineStar size={20} />
                                            <AiOutlineStar size={20} />

                                        </div>
                                    </p>
                                </div>
                            </>
                        )
                    }
                </div>
            </div>
        </div>
    )
}

export default Profile
With these files updated, we can confirm we are done with user authentication and user validation.
At this point, our application should be able to:
- Create account
- Login
- Update Profile on the first login
- View profile information
Sellercan updatestore nameanddescription
Note that I divided this project into several GitHub branches. You can find this section's source code here: GitHub
Next, we will be working on user Seller adding items to the platform.
Adding Products to the Platform
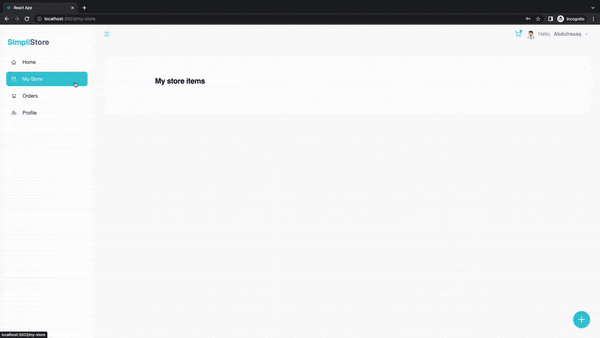
- Navigate to
my-store - Click on the add button, at the bottom right corner of your screen
- You should see the form as shown below
Store Products in the Database
The Item model will be responsible for storing products on the platform.
As you would have guessed, all we need to do DataStore.save as below
        await DataStore.save(new Item({
          name, description,
          price: parseFloat(price),
          quantity: parseInt(qty),
          image: imageFile,
          userID: sub
        }))
Yeah, you guessed right, however, DynamoDB as a NoSQL database service can not store files(images, videos, e.t.c.), we need an additional service to store our image, and that is where Amazon Simple Storage Service (Amazon S3) comes in.
Amazon S3: According to AWS documentation, Amazon S3 is object storage built to retrieve any amount of data from anywhere.
And it offers 5GB of S3 standard storage for 12 months with the AWS Free Tier
How to Create Amazon S3 Bucket for Amplify Application
- Login to the AWS console
- Search for
amplify, and click to open amplify - Click on your app name
- Click the
Launch studiobutton to open the project - At the side nav of the amplify studio, click on
Storage - In
Authorization settings, check as shown below
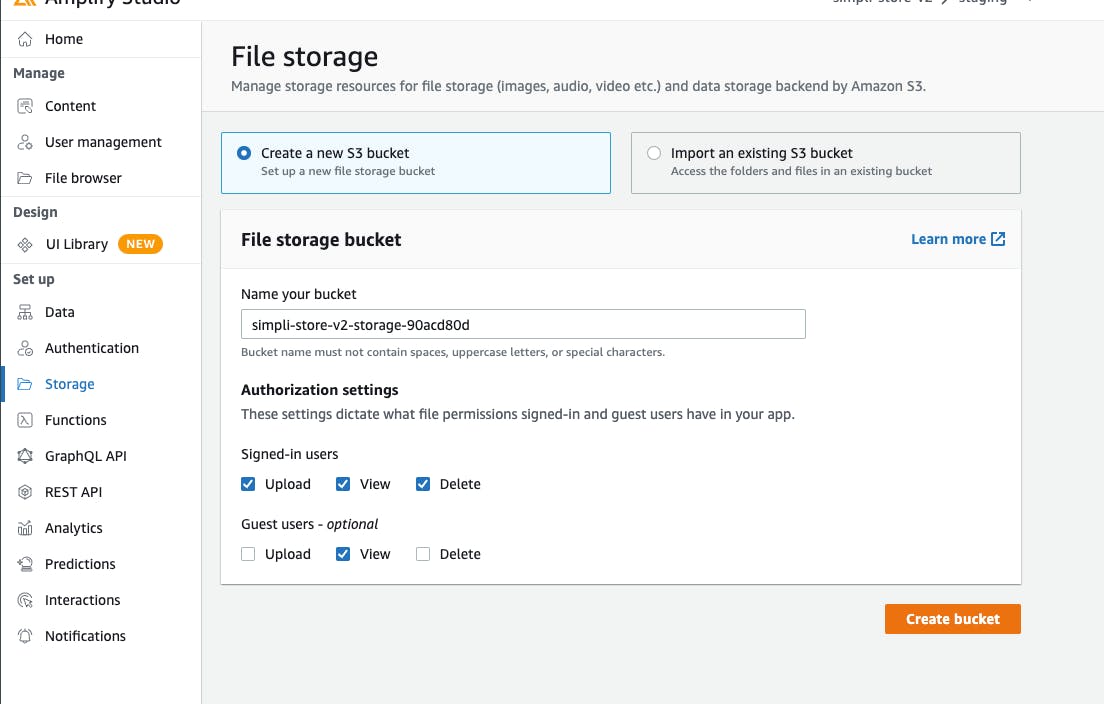
- Click the
Create bucketbutton - Wait while AWS deploys and syncs the S3 bucket to the project.
- Once deployment is completed
- Let's run
amplify pullin our terminal to pull the latest change - Once the pull is done and successfully, we now have access to our S3 bucket, easy and straightforward, right?
Since we now have storage to store our images let's continue with storing products in the database. To implement this:
- We will store the product image in an S3 bucket with a unique name
- We will store the image's unique name in the DynamoDB alongside the rest of the product information. To see this in action check out the below code:
       const handleAddItem = async () => {

        //to add product image to S3 bucket
        await Storage.put(uniqueName, imagetoUpload);

        // to add product to dynamoDB
        await DataStore.save(new Item({ name, description, price: parseFloat(price), quantity: parseInt(qty), image: uniqueName, userID: sub }))
            .then((res) => {
                console.log(res, "resresres")
            })
            .catch((err) => {
                console.log(err, "errerrerr")
            })
    }
To implement this in our project,
let's update handleAddItem function in AddItem.jsx as below:
// import these modules
import { Item } from '../models';
import { DataStore, Storage } from 'aws-amplify';
import { useAuthContext } from '../contexts/AuthContext';

//destucture `sub` from `useAuthContext`
 const { sub } = useAuthContext()

    function makeid(length) {
        var result = '';
        var characters = 'ABCDEFGHIJKLMNOPQRSTUVWXYZabcdefghijklmnopqrstuvwxyz0123456789';
        var charactersLength = characters.length;
        for (var i = 0; i < length; i++) {
            result += characters.charAt(Math.floor(Math.random() *
                charactersLength));
        }
        return result;
    }

    const handleAddItem = async () => {
        const fileName = makeid(20);

        await Storage.put(fileName, imagetosend);

        await DataStore.save(new Item({ name, description, price: parseFloat(price), quantity: parseInt(qty), image: fileName, userID: sub }))
            .then((res) => {
                console.log(res, "resresres")
                close()
            })
            .catch((err) => {
                console.log(err, "errerrerr")
            })
    }
};
export default AddItem;
You will agree with me that it will make more sense if I can see the product in my-store as it is added.
To implement this:
- We will fetch every product in the database that was added by the user
- We will iterate through the search response to get each product image name
- we will use each image name to fetch the image URL from the S3 bucket
- we will then add the image URL as an additional attribute
S3imageto the product
To implement these in our project, let's update Shop.jsx as below:
import React, {useState, useEffect} from 'react'
import { AiOutlinePlus } from 'react-icons/ai'
import AddItem from '../components/AddItem'
import { Storage, DataStore } from 'aws-amplify';
import {Item} from './../models';
import { useAuthContext } from '../contexts/AuthContext';
import { useNavigate } from 'react-router-dom';
import { PriceFormatter } from '../utils/PriceFormatter';
import Button from '../components/Button';
import { FiEdit } from 'react-icons/fi';
import { LazyLoadImage } from 'react-lazy-load-image-component';
import 'react-lazy-load-image-component/src/effects/blur.css';
const Shop = () => {
const {sub} = useAuthContext()
const [items_list, setItems_list] = useState(null)
const [refresh, setrefresh] = useState(false);
useEffect(() => {
getAllItems()
}, [refresh])
const getAllItems = async () => {
const allItems = await (await DataStore.query(Item, (item)=> item.userID('eq', sub))).sort((x, y) => new Date(y.createdAt) - new Date(x.createdAt))
const products = await Promise.all(JSON.parse(JSON.stringify(allItems)).map(async product => {
const image = await Storage.get(product.image)
product.S3image = image
return product
}))
setItems_list(products)
}
const refetch = () =>{
setrefresh(!refresh)
}
const navigate = useNavigate()
const [showAdd, setshowAdd] = useState(false)
if(!items_list){
return <>Loading....</>
}
return (
<div>
<div className="m-5 md:m-10 mt-24 p-1 md:p-10 bg-white rounded-3xl">
<div className='fixed right-8 bottom-24 lg:bottom-8' style={{ zIndex: '19' }}>
<button
type="button"
onClick={() => setshowAdd(true)}
style={{ background: 'var(--main)', borderRadius: '50%' }}
className="text-3xl text-white p-3 hover:drop-shadow-xl hover:bg-light-gray shadow-md"
>
<AiOutlinePlus />
</button>
</div>
{
showAdd && <AddItem close={()=> {setshowAdd(false); refetch()}}/>
}
<div className="bg-white">
<div className="mx-auto max-w-2xl py-4 px-4 sm:py-6 sm:px-6 lg:max-w-7xl lg:px-8 pb-24">
<h2 className="text-2xl font-bold tracking-tight text-gray-900">My store items</h2>
<div className="mt-6 grid grid-cols-1 gap-y-10 gap-x-6 sm:grid-cols-2 lg:grid-cols-4 xl:gap-x-8">
{items_list?.map((product, index) => (
<div
key={product.id} className="group cursor-pointer shadow-md"
>
<div
onClick={()=> navigate(`/item/${product.id}`)}
className="min-h-80 aspect-w-1 aspect-h-1 w-full overflow-hidden rounded-md hover:opacity-75 lg:aspect-none lg:h-80">
<LazyLoadImage
className="h-full w-full object-cover object-center lg:h-full lg:w-full"
width="100%"
height = "100%"
effect="blur"
src={product.S3image}
/>
</div>
<div
onClick={()=> navigate(`/item/${product.id}`)}
className="mt-4 flex justify-between space-x-2 p-2">
<div>
<h3 className="text-sm text-gray-700">
{product.name}
</h3>
</div>
<p className="text-sm font-medium text-gray-900">₦{PriceFormatter(product.price)}</p>
</div>
<Button
onClick={()=> navigate(`/edit/${product.id}`)}
icon={<FiEdit />}
color="rgb(153, 171, 180)"
bgHoverColor="light-gray"
size="2xl"
borderRadius="50%"
/>
</div>
))}
</div>
</div>
</div>
</div>
</div>
)
}
export default Shop
Let's also implement our Home page, the home page is similar to the above Shop.jsx but this time we are displaying every product on the platform.
Let's also update Dashboard.jsx as below:
import React, { useEffect, useState } from 'react'
import UpdateUser from '../components/UpdateUser'
import { useAuthContext } from '../contexts/AuthContext'
import { DataStore, Storage } from 'aws-amplify'
import { Item } from '../models'
import { useNavigate } from 'react-router-dom'
import { PriceFormatter } from '../utils/PriceFormatter'
import { LazyLoadImage } from 'react-lazy-load-image-component';
import 'react-lazy-load-image-component/src/effects/blur.css';
const Dashboard = () => {
const { dbUser } = useAuthContext()
const [items_list, setItems_list] = useState(null)
const navigate = useNavigate()
useEffect(() => {
getAllItems()
}, [])
const getAllItems = async () => {
const allItems = await (await DataStore.query(Item)).sort((x, y) => new Date(y.createdAt) - new Date(x.createdAt))
// console.log(allItems,"all itemsss")
const products = await Promise.all(JSON.parse(JSON.stringify(allItems)).map(async product => {
const image = await Storage.get(product.image)
product.S3image = image
return product
})
)
setItems_list(products)
}
if (!items_list) {
return <>Loading....</>
}
return (
<div>
{
dbUser === undefined && <UpdateUser
showClose={false}
/>
}
<div className="m-5 md:m-10 mt-24 p-1 md:p-10 bg-white rounded-3xl">
<div className="bg-white">
<div className="mx-auto max-w-2xl py-4 px-4 sm:py-6 sm:px-6 lg:max-w-7xl lg:px-8 pb-24">
<h2 className="text-2xl font-bold tracking-tight text-gray-900">All items</h2>
<div className="mt-6 grid grid-cols-1 gap-y-10 gap-x-6 sm:grid-cols-2 lg:grid-cols-4 xl:gap-x-8">
{items_list?.map((product, index) => (
<div
key={product?.id} className="group cursor-pointer shadow-md"
onClick={() => navigate(`/item/${product?.id}`)}
>
<div className="min-h-80 aspect-w-1 aspect-h-1 w-full overflow-hidden rounded-md bg-none hover:opacity-75 lg:aspect-none lg:h-80">
<LazyLoadImage
className="h-full w-full object-cover object-center lg:h-full lg:w-full"
width="100%"
height = "100%"
effect="blur"
src={product.S3image}
/>
</div>
<div className="mt-4 flex justify-between space-x-2 p-2">
<div>
<h3 className="text-sm text-gray-700">
{product?.name}
</h3>
</div>
<p className="text-sm font-medium text-gray-900">₦{PriceFormatter(product?.price)}</p>
</div>
</div>
))}
</div>
</div>
</div>
</div>
</div>
)
}
export default Dashboard
Next, we will be implementing, the view product page, where we want to see more details about the product.
To implement this:
- We will fetch a product from the database by its ID
Let's update ViewItem/index.jsx as below:
import React from 'react'
import { AiFillStar, AiOutlineStar } from 'react-icons/ai'
import { IoArrowBack } from 'react-icons/io5'
import { useNavigate, useParams } from 'react-router-dom'
import { Item } from '../../models'
import './styles.css'
import {DataStore, Storage} from 'aws-amplify'
import { useState } from 'react'
import { useEffect } from 'react'
import { PriceFormatter } from '../../utils/PriceFormatter'
import { User } from '../../models'
import { useAuthContext } from '../../contexts/AuthContext'
import { Cart } from '../../models'
const ViewItem = () => {
const {id} = useParams();
const { sub,dbUser } = useAuthContext()
const [item, setItem] = useState(null)
const [seller, setSeller] = useState(null)
const navigate = useNavigate()
// useEffect(() => {
// DataStore.query(Item, id).then(setItem)
// }, [])
useEffect(() => {
getItem()
}, [])
const [images, setimages] = useState('')
const getItem = async () => {
const itemInfo = await DataStore.query(Item, id)
setItem(itemInfo)
const image = await Storage.get(itemInfo.image)
setimages(image)
const sellerInfo = await DataStore.query(User, (user)=> user.sub('eq', itemInfo.userID))
setSeller(sellerInfo[0])
}
const addToCart = async () => {
await DataStore.save(new Cart({ buyer_id : sub, quantity: 1, item_id: item.id }))
.then((res) => {
console.log(res, "resresres")
})
.catch((err) => {
console.log(err, "errerrerr")
})
}
if(!item){
return <>Loading...</>
}
return (
<div>
<div className="card">
<div className="card__title">
<div className="icon"
onClick={()=>navigate(-1)}
>
<IoArrowBack size={24}/>
</div>
<h3>Products</h3>
</div>
<div className="card__body">
<div className="half">
<div className="featured_text">
<h1 style={{fontSize:'32px'}}>{item?.name}</h1>
<p className="price">₦{PriceFormatter(item?.price)}</p>
</div>
<div className="image">
<img src={images} style={{maxWidth:'250px'}} alt="" />
</div>
</div>
<div className="other_half">
<div>
<div className="description">
<p>{item?.description}</p>
</div>
<div className="stock">{item?.quantity} In stock</div>
<div className="reviews">
<div className="stars">
<AiFillStar size={20} />
<AiFillStar size={20} />
<AiFillStar size={20} />
<AiOutlineStar size={20} />
<AiOutlineStar size={20} />
<span>(64 reviews)</span>
</div>
</div>
</div>
<div className="card__footer">
<div className="recommend">
<p>Added by</p>
<h3>{seller?.storeName}</h3>
</div>
{
dbUser?.role === 'seller' ?
null
:
<div className="action">
<button type="button" onClick={addToCart}>Add to cart</button>
</div>
}
</div>
</div>
</div>
</div>
</div>
)
}
export default ViewItem
Next, sellers should be able to update products in their store
To implement this:
- We will fetch a product from the database by its ID and where the item is added by the user.
Let's update Edit_item.jsx as below:
import React, { useState } from 'react'
import { useEffect } from 'react'
import { FiPlus } from 'react-icons/fi'
import { MdOutlineCancel } from 'react-icons/md'
import { useNavigate, useParams } from 'react-router-dom'
import Button from '../components/Button'
import IconButton from '../components/IconButton/IconButton'
import Input, { Textarea } from '../components/Input'
import {DataStore, Storage} from 'aws-amplify'
import { Item } from '../models'
import { useAuthContext } from '../contexts/AuthContext'

const Edit_item = () => {

    const {id} = useParams();
    const {sub} = useAuthContext();
    const navigate  = useNavigate()

    const [item, setItem] = useState(null)
    const [name, setName] = useState('')
    const [description, setdescription] = useState('')
    const [image, setimage] = useState('')
    const [img_ref, setimg_ref] = useState('')
    const [imagetosend, setimagetosend] = useState('')
    const [price, setPrice] = useState('')
    const [qty, setQty] = useState('')

    useEffect(() => {
        getItem()
      }, [])

      const [defaultimage, setdefaultimage] = useState('')

      const getItem = async () => {
        const itemInfo = await DataStore.query(Item, (item)=> item.id('eq', id) && item.userID('eq', sub))
        setItem(itemInfo[0])
        // console.log(itemInfo[0])
          const image = await Storage.get(itemInfo[0].image)
          setimage(image)
        setdefaultimage(image)

      }


    useEffect(() => {
        setName(item?.name)
        setdescription(item?.description)
        setPrice(item?.price)
        setQty(item?.quantity)
        setimg_ref(item?.image)
    }, [item])


    const re = /^[0-9\b]+$/;
    const changeQty = (e) => {
        if (e.target.value === '' || re.test(e.target.value)) {
            setQty(e.target.value)
        }
    }
    const changePrice = (e) => {
        if (e.target.value === '' || re.test(e.target.value)) {
            setPrice(e.target.value)
        }
    }

    const convert_to_base64 = file => new Promise((response) => {
        const file_reader = new FileReader();
        file_reader.readAsDataURL(file);
        file_reader.onload = () => response(file_reader.result);
     });

    const imageHandler = async (file) => {
        setimagetosend(file.target.files)
        const my_image = await convert_to_base64(file.target.files[0]);
        setimage(my_image)
    }

    const handleUpdateItem = async () =>{
        if(defaultimage !== image && imagetosend.length === 1){
            console.log(img_ref,"hghhhh")
            await Storage.put(img_ref, imagetosend[0]);
        }
        DataStore.save(
            Item.copyOf(item, (update) => {
              update.name = name
              update.description = description
              update.price = parseFloat(price)
              update.quantity = parseInt(qty)
            //   update.image = image
            }))
            .then((res) => {
              console.log(res)
              navigate(-1)
            })
            .catch((err) => {
              console.log("error", err)
            })
    }

    if(!item){
        return <>Loading...</>
    }

    return (
        <div className="m-5 md:m-10 mt-24 p-1 md:p-10 bg-white rounded-3xl">

            <div className="bg-white">
                <div className="mx-auto max-w-2xl py-4 px-4 sm:py-6 sm:px-6 lg:max-w-7xl lg:px-8">
                    <h2 className="text-2xl font-bold tracking-tight text-gray-900 m-auto max-w-xl" >Edit items</h2>
                    <form className="m-auto mt-8 max-w-xl">
                        <Input
                            handleChange={(e) => setName(e.target.value)}
                            value={name}
                            labelText='Name'
                            labelFor="name"
                            id="name"
                            name="name"
                            type="text"
                            isRequired={true}
                            placeholder='Name'
                        />
                        <div className="flex gap-4">
                            <div className='w-1/2'>
                            <input
                                style={{ display: "none" }}
                                id="galleries"
                                name="galleries"
                                type="file"
                                accept="image/x-png,image/gif,image/jpeg,image/webp"
                            onChange={imageHandler}
                            />
                            <label htmlFor="galleries" className="upload">
                                <div className="galla_card" style={{backgroundImage: `url(${image})`}}>
                                    <IconButton bg="#c9edf0" width="30px" height="30px" icon={<FiPlus color='var(--main)' size={20} />} />
                                    <span>Upload image</span>
                                </div>
                            </label>
                            </div>
                            <div className='w-1/2'>
                                <Input
                                    handleChange={changePrice}
                                    value={price}
                                    labelText='Price'
                                    labelFor="price"
                                    id="price"
                                    name="price"
                                    type="text"
                                    isRequired={true}
                                    placeholder='Price in naira'
                                />
                                <Input
                                    handleChange={changeQty}
                                    value={qty}
                                    labelText='Quantity'
                                    labelFor="quantity"
                                    id="quantity"
                                    name="quantity"
                                    type="text"
                                    isRequired={true}
                                    placeholder='Quantity'
                                />
                            </div>
                        </div>
                        <Textarea
                            handleChange={(e) => setdescription(e.target.value)}
                            value={description}
                            labelText='Description'
                            labelFor="description"
                            id="description"
                            name="description"
                            type="textarea"
                            rol={4}
                            isRequired={true}
                            placeholder='Description'
                        />
                        <Button
                            color="white"
                            bgColor='var(--main)'
                            text="Update item"
                            borderRadius="10px"
                            width="full"
                            onClick={handleUpdateItem}
                        />
                    </form>
                </div>
            </div>
        </div>
    )
}
export default Edit_item
With the above completed we can say we are have we are done with the products management flow.
Note that I divided this project into several GitHub branches. You can find this section's source code here: GitHub
Next, we will be working on the order flow.
As earlier stated, in the project overview, this project will have two personas which are seller and buyer, where buyer will be the persona who will place an order.
Let's create a new user account and this time we will update the profile as a sender, see as shown below.
With the account created we need to update the dashboard of the sender a bit, let’s update the sidebar navigation and bottom navigation for desktop and mobile view respectively.
Let’s update variable links in Sidebar.jsx as shown below:
//add import statement at the top
import { useAuthContext } from '../contexts/AuthContext';

//destruction dbUser from useAuthContext
const {dbUser}  = useAuthContext()

//update links as below
const links =
    dbUser?.role === 'seller' ?
      [
        { name: 'home',  icon: <AiOutlineHome /> },
        {  name: 'my-store',  icon: <FiShoppingBag /> },
        {  name: 'orders',  icon: <AiOutlineShoppingCart />, },
        { name: 'profile',  icon: <RiContactsLine />, },
      ]
      :
      [
        { name: 'home',  icon: <AiOutlineHome />,},
        { name: 'my-orders', icon: <FiShoppingBag />, },
        { name: 'cart',  icon: <AiOutlineShoppingCart />,},
        { name: 'profile',  icon: <RiContactsLine />,},
      ]
Let’s also update variable links in BottomNav/index.jsx as shown below:
//add import statement at the top
import { useAuthContext } from '../contexts/AuthContext';

//destruction dbUser from useAuthContext
const {dbUser}  = useAuthContext()

//update links as below
const links =
    dbUser?.role === 'seller' ?
      [
        { name: 'home',  icon: <AiOutlineHome /> },
        {  name: 'my-store',  icon: <FiShoppingBag /> },
        {  name: 'orders',  icon: <AiOutlineShoppingCart />, },
        { name: 'profile',  icon: <RiContactsLine />, },
      ]
      :
      [
        { name: 'home',  icon: <AiOutlineHome />,},
        { name: 'my-orders', icon: <FiShoppingBag />, },
        { name: 'cart',  icon: <AiOutlineShoppingCart />,},
        { name: 'profile',  icon: <RiContactsLine />,},
      ]
With the above update implemented, sellers will be able to navigate between
home page: which shows all products on the platform,my-store page: which shows all products in the platform added by the sellerorders: which shows the list of seller products ordered for.profile: shows seller profile information
Buyers should be able to navigate between
home page: which shows all products on the platform,my-orders page, which shows the list of all order requests.cart: which shows the list of products added to the cart.profile: shows seller profile information
Next, let's implement Add to cart functionality
Implementing Add Item to Cart Functionality
In this module we will start working on the Cart model, the cart model requires the ID of the buyer buyer_id, the quantity, and the item_id.
Let’s update the addToCart function in ViewItem/index.jsx as below :
const addToCart = async () => {
        await DataStore.save(new Cart({ buyer_id : sub, quantity: 1, item_id: item.id }))
            .then((res) => {
                console.log(res, "resresres")
            })
            .catch((err) => {
                console.log(err, "errerrerr")
            })
    }
From the above, we are familiar with DataStore.save, the above item will save item to the Cart model.
Next, let’s implement the cart page, where we get to see products added to the cart
let's update getAllItems function in BuyerCart.jsx as below:
// import these modules
import { useAuthContext } from "../contexts/AuthContext"
import { Cart } from "../models";
import { DataStore, Storage } from 'aws-amplify'
import { Item } from "../models";

//destucture `sub` from `useAuthContext`
const { sub } = useAuthContext()


const getAllItems = async () => {
        //get all my user cart items in cart table
        const myCartItems =  (await DataStore.query(Cart, (item) => item.buyer_id('eq', sub))).sort((x, y) => new Date(y.createdAt) - new Date(x.createdAt))

        //get cart items information from Item table and add cartid to each response
        const fetchItems = await Promise.all(
            JSON.parse(JSON.stringify(myCartItems))
            .map(async cart => {
                const eachQuery = await Promise.all(
                    JSON.parse(JSON.stringify(
                        await DataStore.query(Item, (item) => item.id('eq', cart.item_id))
                    ))
                )
                eachQuery[0].cartID = cart.id;

            return eachQuery[0]
        }))

        //get cart items image from s3 bucket
        const fetchItemsImage = await Promise.all(
            JSON.parse(JSON.stringify(fetchItems))
            .map(async cart => {
                const image = await Storage.get(cart.image)
                cart.S3image = image
            return cart
        }))

        setCart_list(fetchItemsImage)
    }

    if (!cart_list) {
        return <>Loading....</>
    }
Now that we are able to display the list of carts, let's proceed to implement the order functionality
Note that I divided this project into several GitHub branches. You can find this section's source code here: GitHub
Implement the Order Functionality
In this module, we will start working on the Order model. To implement the place order functionality,
Let’s update the handleOrderNow function in the CartItem.jsx as below:
// import these modules
import { Cart, Item, Order } from '../models';
import { useAuthContext } from '../contexts/AuthContext';
import { DataStore } from 'aws-amplify';

//destucture `sub` from `useAuthContext`
const { sub } = useAuthContext()

const handleOrderNow = async () => {
        // add item to order table

        await DataStore.save(new Order({
            buyer_id: sub,
            seller_id: item.userID,
            price: parseFloat(price),
            quantity : parseInt(qty),
            total: parseFloat(total),
            name: item.name,
            image: item.image,
            item_id: item.id
        }))
            .then(async (res) => {
 // delete item from cart
                const todelete = await DataStore.query(Cart, item.cartID);
                DataStore.delete(todelete)
                    .then(async (res) => {
           // update the quantity of item in Item table
                        const itemToUpdate = await DataStore.query(Item, item.id);
                        DataStore.save(
                            Item.copyOf(itemToUpdate, (update) => {
                                update.quantity = parseInt(qty_available) - parseInt(qty)
                            }))
                            .then(async (res) => {
                                onsuccess()
                            })
                            .catch((err) => {
                                console.log(err, "update errerrerr")
                            })

                    })
                    .catch((err) => {
                        console.log(err, "delete err")
                    })
            })
            .catch((err) => {
                console.log(err, "add errerrerr")
            })

    }
The above function will
- Add order to the
Ordermodel table - Remove the product from cart and
- Reduces the product quantity in the
Itemmodel table.
Let's implement the order page, where we get to see lists of orders.
Let’s update the getOrders function in BuyerOrder.jsx as below:
// import these modules
import { useAuthContext } from '../contexts/AuthContext'
import { Order } from '../models'
import { DataStore, Storage } from 'aws-amplify'


//destucture `sub` from `useAuthContext`
const { sub } = useAuthContext()

const getOrders = async () =>{
        const myOrders = (await DataStore.query(Order, (item) => item.buyer_id('eq', sub))).sort((x, y) => new Date(y.createdAt) - new Date(x.createdAt))

        const fetchOrdersImage = await Promise.all(
            JSON.parse(JSON.stringify(myOrders))
            .map(async order => {
                const image = await Storage.get(order.image)
                order.S3image = image
            return order
        }))

        setorder_list(fetchOrdersImage)
            }

    if(!order_list){
        return <>Loading...</>
    }
The above will show the list of all orders placed by the buyer.
Let implement the order page for the sellers as well
Let’s update the getOrders function in Order.jsx as below:
// import these modules
import { useAuthContext } from '../contexts/AuthContext'
import { Order } from '../models'
import { DataStore, Storage } from 'aws-amplify'


//destucture `sub` from `useAuthContext`
const { sub } = useAuthContext()

const getOrders = async () =>{
        const myOrders =  (await DataStore.query(Order, (item) => item.buyer_id('eq', sub))).sort((x, y) => new Date(y.createdAt) - new Date(x.createdAt))

        const fetchOrdersImage = await Promise.all(
            JSON.parse(JSON.stringify(myOrders))
            .map(async order => {
                const image = await Storage.get(order.image)
                order.S3image = image
            return order
        }))

        setorder_list(fetchOrdersImage)
            }

    if(!order_list){
        return <>Loading...</>
    }
Note that I divided this project into several GitHub branches. You can find this section's source code here: GitHub
And that is all. You have a super cool, fully functioning e-commerce application.
Now let me show how I deploy this project with AWS Amplify
How to Host Web Application in AWS Amplify
Hosting a web application with Aws amplify is pretty easy and straightforward. To host, let's follow the below steps.
- First of we need to push our code to a repository (Github, Bitbucket, e.t.c), I will be using Github.
- On the Amplify console, we need to create a new app.
- Click the
New Appdrop-down and selecthost web app. - it will ask to connect the repository where the code base is hosted,
- Select GitHub
- On select, you will need to authorize amplify to have access to your GitHub
- Once authorization is completed, you will see a list of repositories from your GitHub
- Select the repository you want to host
- Next, select the branch from the repository you want to host
- Next, Create a new environment, this can be any string but less than ten characters
- Next, you need to create a service role, click create a service role and follow the instruction
- Once done click next, where you will see the summary of your selections.
- Finally click
save and deploy, wait and relax while AWS deploys your application
Wrapping up and Next Steps
I hope you’ve enjoyed working through this tutorial. In this exciting article, I explained how to build an e-commerce backend with AWS Amplify. Below are some of what we are able to learn in this article
- What AWS Amplify is, and how easy it is to start up with.
- How to create a backend app from the Amplify console,
- How to connect our React frontend to amplify the backend,
- How to set up authentication in a few clicks,
- How to create models (database tables) from the Amplify console.
- How to create an S3 bucket to store objects (images, etc)
- How to add data to the database (DynamoDB)
- How to fetch data from a database
- How to delete data from the database
- How to update data in the database
- How to add an image to S3 bucket
- How to fetch images from S3 bucket
- How to update the image in S3 bucket
- We also, learn to deploy how frontend with Amplify
What Next? Well, this is going to be the end of this article, but not going to be my last contribution to the project. There's still a lot that can be done on this project like:
- Processing order
- Processing delivery operation, and a lot more
If there is anything you would like to add, you are welcome to Git fork the project and modify it how you see fit. Keep in mind that the sky is your starting point! I would also like to invite you to follow me on this website as well as connect with me on Twitter for more exciting articles.
Resources and References
How to customize Amplify HOC withAuthenticator
How to install and configure AWS Amplify CLI
How to use tailwind CSS with React
How to create a fully customized authentication flow with AWS Amplify